Logo Header

Logo Header

Announcements

Announcements
We have not been able to gain access to our original blog at elementaldoodles.blogspot.com . Therefore, we are recreating that blog here. Please bear with us while we copy all the content over.


Monday, August 18, 2014

Are You A Fan?


I have been a fan of artist trading cards, also known as, ATC's for a long time.  They are quick projects to make when you are wanting to be creative, but don't have a lot of time. They are very popular with crafters often being traded amongst one another or sent as a little extra something inside of a card.  There are even groups centered around the making and trading of them, too.  There are a couple rules that come with ATC's that you will want to be sure to follow.  They are always 2 1/2" x 3 1/2" in size and they are never sold, only traded. 

The wonderful thing about the size of ATC's is that the stamps from Elemental Doodles fit perfectly on them.  There is no guessing if your favorite design will fit.  It will!  I created this ATC using the Garden of Friends set and the Mini Garden of Friends set to complete the image.  I plan on turning this into a series of ATC's which is a design based on the same theme, but has different design to each card.  This series number is written on the back of the card to represent edition or number of the card to how many were made in the series.  For instance, this card would be 1 of 4 or 1/8. 

Here is what you will find on the back of an ATC:
Your Name
Some may contain your address or email but only if you want it on
Theme of Card
Date Made
Series #

Do I have you thinking about making your own ATC's yet using the stamps from Elemental Doodles?  I hope so!  The first thing now is to head over to the Elemental Doodles website and pick the stamps you want to use on your sets of ATC's. 

I'm a fan.  Are you? 

~Peg

Wednesday, August 6, 2014

The Black Magic Technique Elemental Doodles Style

 
Hi Everyone!  Peg here and today I would like to share with you the Black Magic Technique using the Santa's White Christmas stamp set and the Mini Santa's White Christmas set.   This technique has been a favorite one of mine for a long time and when I used it with the stamps from Elemental Doodles I loved it even more and was anxious to share it with all of you.
 
For this technique, you will need a black piece of cardstock that is smooth for stamping on. It can be any size you would like.  Begin by stamping the snowman image, the snow flakes and the drifts onto the paper using  a white ink.  Make sure the ink is completely dry before doing the next steps or it is likely to smear.  You can dry it quickly and set the ink using a heat tool. 

Once the ink is dry, begin adding color to the stamped lines of the image with your favorite colored pencils.  Once the lines are colored the first time, use a blending pencil to go over them.  This will smooth them out and blend them together.  Add more layers of color to make them stand out more being sure to blend them in between each layer. 
 
This is a great technique that allows you to use the dark cardstocks that you have in your stash and the white ink that you like so well, but still has some color to it to make it pop.  Now, it's your turn to try this technique out and don't forget to head over and get some of the fantastic stamps from Elemental Doodles.  Share with us on the Elemental Doodles Facebook page if you have used some of the stamps, too!  We'd love to see what you've created! 
 
Be sure to have some stamped fun today!
 
~Peg

Saturday, August 2, 2014

Golden Autumn by Etha


This card was created by Etha Schuette using stamp set ED019 , Garden of Friends by Elemental Doodles.

Materials:
Designer Paper - Basic Grey "sugared"
copics
brads - Basic Grey
Sewing Machine
CS (brown, white- PTI, Wasau
fine tip marker brown - Marvy
Stamp Set - ED019 Garden of Friends - Elemental Doodles

Instructions:
  1. Stamp image and sentiment on white panel, color with copics.
  2. Add tiny dots on bottom of image with brown marker.
  3. Stamp image again, color and cut out inside flower, add to main image with pop dot.
  4. Layer onto brown cs.
  5. cut two 1"x3" strips from designer paper, layer onto brown and decorate by sewing edge.
  6. Add designer paper panel to brown cs.
  7. Stamp flower spray twice, color flowers and cut out.
  8. Add flowers to all 4 corners of designer paper background panel and add brown mini brads in their centers.
  9. Mount onto top-fold white base card.
  10. Attach stamped and sewn panels as shown.


4th of July Card by Jane


This card was created by one of our Founding Design Team Members several years ago, Jane Peters.  Stamps used ED005 Firecracker USA

Materials Used:
Red CS
White CS
Striped Patterned Paper - #302 boy o boy dotted line by Doodlebug Design Inc
Denim Patterned Paper by Leisure Arts, Inc.
Red Pepper Dye Ink - Adirondack
Photo Corner Punch - Stampin' Up!
Small Star Punch - Carl

Instructions:
  1. On reverse side of striped paper draw three wavy rectangles; cut out.
  2. Mount striped paper on white CS and trim to size.
  3. Stamp 4th of July, Fireworks bursts, hat and USA with Red Pepper ink on white CS. 
  4. Punch small photo corners and adhere to corners of striped paper.
  5. Punch 8 small stars from denim patterned paper and adhere to photo corners.


New Stamps Coming Soon

We are currently working on Fall, Halloween and Christmas stamp sets to be released soon.  A sneak peek and pre-ordering will be made available very soon.

Saturday, July 19, 2014

Online Ordering Now Enabled

We have set up an online ordering page on our main website.  www.ElementalDoodles.com .  Browse our sets available and then just click the Place An Order link at the top of the page.  Follow onscreen instructions to place your order.

Please let us know if you have any problems with the ordering system.

Thursday, July 17, 2014

"Framed Coffee" by Connie


This image by Elemental Doodles is set off perfectly by the glitzy frame isn't it?

I layered a burgundy panel over the grey base and another grey panel run thru the Cuttlebug "Swiss Dots" folder over that.  I stamped the image in burgundy ink onto a scrap of white and trimmed to fit the frame then tied small tags stamped with words from the same ED stamp set onto the frame before adhering it all on the card.

It's hard to see in my scan, but the frame has gorgeous burgundy jewels scattered around.
Connie
Founding Designer

Chocoholic by Karyn

Description and instructions are posted below just how Karyn posted them on our original blog.  Her project shows just how versatile our stamps are.


When I first saw the Chocoholic stamp set from Elemental Doodles i knew they would be fun to use for things other than cards too!  Today I am sharing something I made.

I saw this sign at Joann's and picked it up thinking I want to see if the Scent-A-Mist's will work on things like this. (side note from ED 7/6/14:  Scent-A-Mist is a product we manufactured in 2009 that is no longer available.  However, we will be coming out with a replacement that is more versatile than the original product).  So when I got home I sprayed just the letters with the Chocoholic Scent-A-Mist.  Mmmmmmm I was messaging with a friend later and told her that spraying chocolate scent in the craft room at something like 6 AM was not the proper way to start off a Saturday because I was already wanting chocolate since every time I stepped near the room that was all I smelled!  We laughed about it but I DID have to get chocolate later in the day I couldn't take it anymore!  LOL

I then used the chocolate "splats" to randomly stamp with Memento Rich Cocoa Ink all over the letters and the base.  It was dark enough that it contrasted with the Scent-A-Mist on the letters.

For the base part I used Ranger Distress Crackle Paint in Antique Linen.  Look at the close up and you can see the crackle.  I didn't put it on real thick so the crackles are just small but enough for the look I wanted.


I used the wording from the stamp set to stamp along the sides of the letters it says:  "Friends are the chocolate dipped cherries of life!"

I then had stamped and colored and assembled some chocolate dipped cherries to use on the wood too.  I attached them with red line tape.  Can you see the cherries are all shiny too?  I used Crystal Lacquer on the top of them.  As a finishing touch I added the thin band of ribbon around and tied between the F and R as it was a large gap and looked funny with nothing there.  :)  I did use Tombow MonoMulti Glue under the ribbon so it would stay snug to the wood too.

So as you can see the stamps aren't just for cards and the Scent-A-Mist isn't just for paper!  Use your imagination and have fun!

hugs,
Karyn
Founding Designer

Just a Note by Connie


Back in October 2009 we posted a challenge for our DT.  This is the result from one of our DT members.  Her instructions are below.

Here is my rendition of the October challenge.  We could use the colors red, black and white with any theme.

Supplies:
Just A Note stamp set - Elemental Doodles
red, black and white CS
black glitter brads
Circle Punch (McGill)
Double Stick Tape (Scotch)
Black Memento dye ink (Tsukineko)

Instructions:
  1. Fold red CS into A2 card
  2. Cut 2 white panels and layer on 2 black panels slightly larger
  3. Stamp images on larger white panel and affix to red base on left side.
  4. Punch 3 evenly spaced holes in smaller white panel and put 3 large black brads thru and adhere to red base
Connie
Founding Designer

Garden of Friends by Janine

Here are two cards I made using the Garden of Friends stamp set.


This card was made using the following materials and tools:  Spellbinders Die Templates used: S4-114 Standard Circles LG #1, S4-205 Eyelet Pendant Center, S4-189 Labels Three #3.  Cuttlebug Swiss Dot Embossing folder, EK Success Arch Lattice Border, Copic Markers, Ribbon.


This card used the following materials and tools:  Spellbinders Die Templates: S5-012 Classic Frame Center, S4-132 Classic Rectangles LG #3, S4-133 Classic Scalloped Rectangles LG #4, S3-147 Labels Trio #3.   Cuttlebug Victoria Embossing Folder, Copic Markers, Ribbon.
I hope you enjoy these two projects. 
Enjoy!
Janine
Founding Designer

Autumn Splendor Card by Cat


This card features a beautiful outline and fill in combination.  I used dark green ink for the outline of the leaf.  Then I took ,my markers and scribbled on the outside of the solid leaf stamp with green and the inside with a grayish lighter green, leaving space between the two.  I misted the stamp with a spritzer spray bottle and stamped the inside.  I love how blotchy it looks, just like the leaves all over my driveway.

For the text, I took the saying "Autumn is a second spring when every leaf's a flower," and just inked the word "Autumn" with my marker.  Since they are clear stamps, it is so easy to place the word exctly where I wanted it under the leaf.  I used the whole text statement inside the card.

Hope you enjoy ------ cat >^..^<
Founding Designer

Coffee Cafe Card

You can almost smell the coffee aroma from this card!!  Actually you can since I used a coffee scented ink......
Supplies:
Stamps - ED006 Coffee Cafe
Papers by DCWV "Safari Chick" matstack
Brown and Black CS from my stash
Diecut shapes by Nestabilities
Brown dye inkpad by Ranger "Vintage Java Fizz"
Black Memories dye ink

I cut and layered the designer papers onto a black base card leaving slight borders.  I stamped the small cup on the paper and the "wake up" verse on another.  A diecut Nestie stamped with "Java" was layered on top.  Simple and quick, just my style!
Connie 
Founding Designer


Coffee Slider ATC


I am a huge fan of ATCs and our image line was designed specifically for miniature art.  The Coffee Cafe stamp set was used to complete this card.  The coffee cup image was colored using watercolor pencils.  Complete instructions will be posted as soon as I locate the tutorial on it.

Patriotic Card

Firecracker USA stamp set used to create this card.


Wednesday, July 16, 2014

Mystic Fairy Mini Album


This was such an easy and fun project to work on.  All images used are from the Mystic Fairy Stamp Set.
The coloring is done using watercolor pencils and some colors have had Shimmerz paints added for shimmer.
The papers used are from various sources as are the inks.
This project basically uses 3"x3" sleeve protectors, patterned paper, stamps and embellishments of your choice.
Complete instructions will be added shortly.

Tea Card by Kim


This is a tea card using the "Friendship Tea" stamp set.
  1. Card base is double sided card stock cut 6x12", scored at 4" and 8"
  2. On the far right side measure 2" from the bottom and mark.
  3. Cut the cardstock from the mark to the first score at 4" at an angle.
  4. Fold the cardstock like an accordian.
  5. Tape it down with red line tape and stamp.
  6. The tag is cut using a Sizzix die.
  7. Add ribbon to tag.  
  8. Place tea bag in front pocket.

ATC by Kim

This is an ATC stamped using Brilliance inks and Memento inks and the "He is Risen" stamp set.

This is an ATC using the "Firecracker USA" stamp set with Vivid Dye inks in red and blue.

Mystic Fairy Cards by Kim

This is also a 6x6 card.  It has yellow cardstock base.  The rose from the Mystic Fairy stamp set was stamped and embossed in gold and colored with Twinkling H2O's.

Another 6x6 card.  The Swan image and small flourish image is used from the Mystic Fairy stamp set.  The small flourish image is just stamped with watermark ink.


He is Risen Card by Kim


This card uses the amazing Easter set "He Is Risen".

  1. It is a 6x6 card.  
  2. Edges stitched around with a sewing machine in a zig zag stitch.
  3. Cut a strip of green card stock 6x2 1/2, layed a piece of designer paper 6x1 1/4 and then layered offray ribon. 
  4. Pull a piece of ribbon through a button and tied a knot and adhered it to the strip with a glut dot.
  5. Cut a piece of brown background designer paper to 4x3, a piece of green designer paper 3 3/4x2 3/4 and sew them together with a sewing machine.  (I LOVE MY SEWING MACHINE!!).
  6. Cut a 3" scalloped oval with  Cricut using the STorybook cartridge.
  7. Punch an oval out of Canson watercolor paper.
  8. Stamp the wide cross from the He Is Risen stamp set in brown Vivid dye ink.
  9. Adhere the oval to the scalloped oval with red line tape.
  10. Finish the inside with a 3" scalloped patterned paper oval with a 2" oval of Canson watercolor paper with the He Is Risen sentiment from the stamp set.  Stamped in the Brown vivid dye ink.


Card Book by Kim

Note from Kim as posted on our original blog:
I have been working on some more projects using our stamps so that you can see just how beautiful the images are.  The first project I made is a lift from the awesome stampers over at SU.  I don't remember the name of the person I got the tutorial from but just let me say that she has an awesome site and I love to get inspiration from her.


Fairy Card by Kim

This is a card that Kim Baker made using the Forest Fairies Stamp Set.  She used a lot of different elements in this card and had a great time making it!!!!


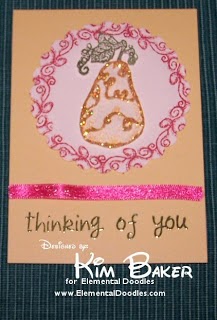
Pear Card Tutorial

Pear Card using First Fruits stamp set & Slice cutting machine


Pear Card Tutorial
I made several of this card in different colors.
Supplies Uses:
~Stamps - Elemental Doodles
~Plain Old CS in various colors
~Printed Paper - Making Memories
~Slice - Cutting Maching
~Slice Noteworthy Design Card
~Cuttlebug Embossing Folder (don't recall the name of this one)
~Ink - Noir Palette - TAC
~Embossing Powder - Transcendence - TAC
~Coloring Medium - Twinkling H2O
~Foam Dots - TAC
~Green Ribbon
~Tiny Hole Punch
~Decorative Brads - Making Memories

Instructions:
  1. Cut and fold CS to regular card size
  2. Emboss front of CS
  3. Cut shapes from printed paper using Slice Noteworthy Design Card (3 1/2" and 4")
  4. Cut tag shape using Slice Noteworthy Design Card (2") on matching plain CS
  5. Stamp and emboss Pear and Pear Leaves
  6. Adhere 4" shape to front of card
  7. Color Pear and Pear Leaves with Twinkling H2O's
  8. Adhere 3 1/2" shape to center of 4" shape using foam dots.
  9. Punch tiny hole in center of tag and add Decorative Brad
  10. Add ribbon to tag and adhere to bottom of card using foam dots.

Just a few projects!!

Posting a few projects using our First Fruits image sets.


We're BACK!!!!!

Yes, Elemental Doodles is coming back!!!!!!

After taking a few years off from manufacturing and selling our stamp images we are now back.  We have many of our original stamp images already in stock and ready to go.  And there are other sets that we have yet to introduce.

We will be making some changes to some of our packaging and accessories offered.

OUR WEBSITE!!!  We have set up a temporary website with all of our stamp sets and accessories posted.  At this moment we are processing all orders via email and Paypal invoices.  We are working on setting up a shopping cart on the site.  But in the meantime, please follow ordering instructions on the Information page on our website.  www.ElementalDoodles.com

Acrylic Rods are available WHILE SUPPLIES LAST only!!!!!  These have been an issue for us to get and keep in stock in the past.  Therefore, we will be changing to regular acrylic blocks in the near future.

DESIGN TEAM CALL!!!!!  We had a DT back in the day when we first began.  While we are not quite ready to add a full DT at this time......we will be in the future.  So watch for our call for designers.

LOCAL CLASSES!!!  We have a booth set up at Unique Boutiques & Marketplace where our stamps and accessories may be purchased locally.  In addition, we will be offering classes through UB&M periodically.  So be sure to check them out.  You can find UB&M on Facebook at https://www.facebook.com/UniqueBoutiques1  Be sure to check them out and visit the store if you are in the area.

In the meantime, please check back often to see what tutorials we post here.  And please share our page with your friends so we can grow this site as well.